티스토리 뷰
<개발순서>
- 요구사항 분석 및 정의
- DB 설계
- 화면 설계
- 구현
- DB구현
- 프로젝트 템플릿 구현
- DTO 구현
- DAO 구현
- 웹페이지 및 컨트롤러 구현
- 테스트(단위,통합T)
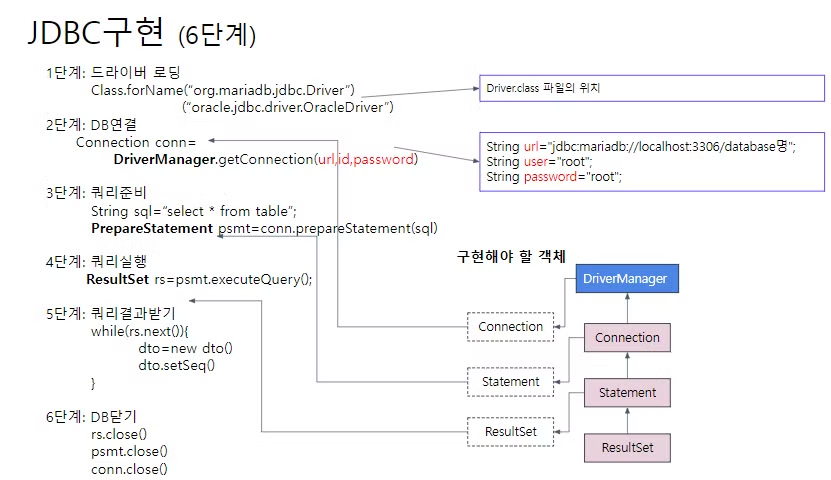
<JDBC 구현 6단계>
- 드라이버 로딩
- DB연결
- 쿼리준비
- 쿼리실행
- 쿼리결과받기
- DB닫기

▫︎ 기본게시판 (기능정의)
- 글 쓰기 : insert
- 글 삭제 : delete
- 글 수정 : update
- 글 상세 : select~where
- 글 목록 : select 전체
<기본게시판 (테이블정의)>
| 컬럼명(물리) | 컬럼명(논리) | 사이즈 | 타입 |
| Seq[PK] | 글번호 | - | INT |
| Id | 아이디 | 20 | Varchar |
| Title | 글제목 | 2000 | Varchar |
| Content | 글내용 | 4000 | Varchar |
| regdate | 작성일 | - | DATE |
CREATE TABLE hkboard (
		seq INT PRIMARY KEY NOT NULL  AUTO_INCREMENT ,
		id VARCHAR(10) NOT NULL,
		title VARCHAR(100) NOT NULL,
		content VARCHAR(1000) NOT NULL,
		regdate DATE NOT NULL
);
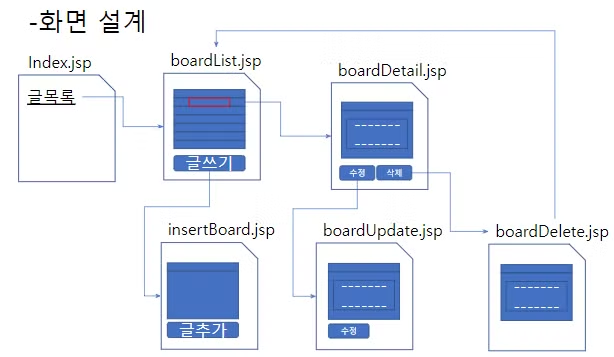
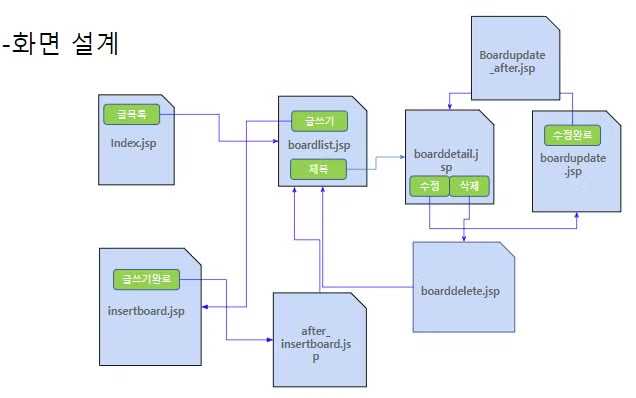
<기본게시판 (화면흐름)>

<기본게시판 (구현 페이지 세부내용)>


<기본게시판 (프로그램 구현)>
- DB드라이버 다운받기(2.6 or 2.7)
https://downloads.mariadb.com/Connectors/java/ - 다이나믹웹프로젝트 생성 (마지막에 web.xml 체크 잊지말자)
- DB드라이버 web-inf/lib 폴더에 넣기
- 자바 클래스 생성 [database, DTO, DAO]
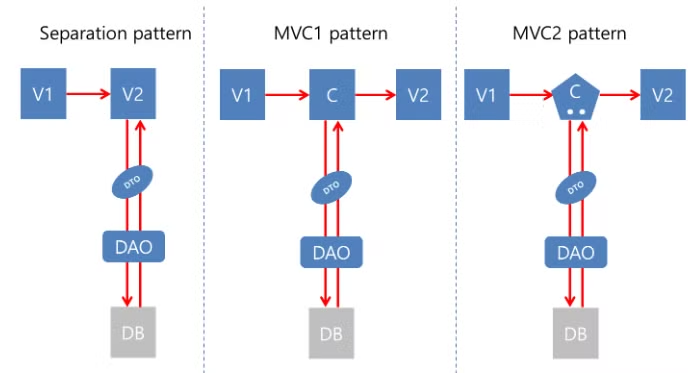
<DAO(Data Access Object) 클래스>
DAO : 데이터베이스에 접근하여 데이터를 조작하는 모든 작업을 수행
애플리케이션의 다른 부분에서 데이터베이스 관련 코드를 직접 다루지 않도록 > 코드의 유지보수성과 재사용성을 높임
1. 드라이버 로딩(생성자 부분)
	//1단계: 드라이버 로딩
	public UserDao() {
		//강제 객체 생성 : 예외처리 무조건 해줘야 함
    try {
        Class.forName("org.mariadb.jdbc.Driver");
        System.out.println("1단계:드라이버로딩 성공");
    } catch (ClassNotFoundException e) {
        e.printStackTrace();
        System.out.println("1단계:드라이버로딩 실패");
    }
}- Class.forName : 드라이버 로딩, JDBC 드라이버를 메모리에 로드하여 데이터베이스와의 연결을 가능하게 함
- try-catch : 드라이버 로딩 시 예외 발생을 막음(try-catch 블록으로 생성)
2. 회원목록 조회(전체 회원 정보 가져오기)
//회원목록 조회기능: [dto,dto,dto....] <-- dto[userID,name,birthYear...]
	public List<UserDto> getAllUser(){
		List<UserDto> list=new ArrayList<>();//회원정보들을 저장할 객체

		//DB연결을 위한 정보 정의
		//url:DB소프트웨어마다 약간씩 다를 수 있음
		String url="jdbc:mariadb://localhost:3306/hkeduweb";
		String user="root";
		String password="1234";

		Connection conn=null; //DB연결할때 사용할 객체
		PreparedStatement psmt=null;//쿼리 준비 및 실행을 위한 객체
		ResultSet rs=null;//쿼리 실행 결과를 받을 객체

		//실행쿼리 작성
		String sql=" SELECT userID , "
				+ "			NAME ,"
				+ "			birthYear ,"
				+ "			addr ,"
				+ "			mobile1 ,"
				+ "			mobile2 ,"
				+ "			height ,"
				+ "			mDate "
				+ " FROM usertbl ";

		//java.sql , java.io , java.net : 무조건 예외처리해야 한다.
		try {
			//DB에 연결된 상태
			conn=DriverManager.getConnection(url, user, password);
			System.out.println("2단계:DB연결성공");
			//쿼리가 준비된 상태
			psmt=conn.prepareStatement(sql);
			System.out.println("3단계:쿼리준비성공");
			//쿼리실행
			rs=psmt.executeQuery();//결과를 반환해줌
			System.out.println("4단계:쿼리실행성공");
			//실행결과받기: DB 데이터를 JAVA에서 사용할 수 있게 변환해서 저장
			while(rs.next()) {
				//실행된 쿼리의 컬럼 순서대로 작성해야 한다.
				UserDto dto=new UserDto();
				dto.setUserID(rs.getString(1));
				dto.setName(rs.getString(2));
				dto.setBirthYear(rs.getInt(3));
				dto.setAddr(rs.getString(4));
				dto.setMobile1(rs.getString(5));
				dto.setMobile2(rs.getString(6));
				dto.setHeight(rs.getInt(7));
				dto.setmDate(rs.getDate(8));
				list.add(dto);//list[dto(row),dto(row),dto(row)..]
			}
			System.out.println("5단계:쿼리결과받기 성공");
		} catch (SQLException e) {
			// TODO Auto-generated catch block
			e.printStackTrace();
			System.out.println("JDBC실패:"+getClass());
		}finally {
			try {
				if(rs!=null) {
					rs.close();
				}
				if(psmt!=null) {
					psmt.close();
				}
				if(conn!=null) {
					conn.close();
				}
				System.out.println("6단계:DB닫기성공");
			} catch (SQLException e) {
				// TODO Auto-generated catch block
				e.printStackTrace();
				System.out.println("6단계:DB닫기실패");
			}
		}
		return list;
	}
1. 결과 리스트 초기화
List<UserDto> list = new ArrayList<>();- List<UserDto> list : 모든 회원정보를 담을 리스트 각 회원 정보는 UserDto 객체로 만들어져서 리스트에 차례로 추가
2. DB 연결 설정
		// DB연결을 위한 정보 정의
		// url : DB소프트웨어마다 약간씩 다를 수 있음
		// url : DB 위치한 서버 위치 지정
		String url = "jdbc:mariadb://localhost:3306/hkeduweb";
		String user = "root";
		String password = "1234";
3. Connection, PreparedStatement, ResultSet 객체 선언
		Connection conn = null;// DB연결할때 사용할 객체
		PreparedStatement psmt = null;// 쿼리 준비 및 실행을 위한 객체
		ResultSet rs = null;// 쿼리 실행 결과를 받을 객체
- Connection : 데이터베이스와 연결을 담당하는 객체 DriverManager.getConnection() 메소드를 사용해 연결을 생성
- PreparedStatement: SQL 쿼리를 실행하기 위해 사용되는 객체 SQL 주입 공격을 방지하고 성능을 높이기 위해 사용
- ResultSet: 쿼리 실행 결과를 담는 객체 데이터베이스에서 가져온 결과를 저장하고, 이를 통해 데이터를 읽음
4. SQL 쿼리문 작성
// 실행쿼리 작성
String sql = " SELECT userID, " +
			 "			NAME," +
		     "			birthYear," +
			 "			addr," +
		     "			mobile1," +
			 "			mobile2," +
		     "			height," +
			 "			mDate"+
		     " FROM usertbl ";
// usertbl에서 해당 속성들을 가져온다
** try-catch문 : 자바에서 예외처리 할 때 사용
1. try 블록 : 예외 발생 가능한 코드 넣기 (DB연결, SQL 쿼리 실행...)
2. catch (SQLException e) 블록 : 예외가 발생했을 때 실행 할 코드
-> try에서 예외 발생하면 catch 블록으로 이동해 예외처리
5. DB 연결 생성
6. SQL 쿼리 준비
7. SQL 쿼리 실행
// java.sql , java.io , java.net : 무조건 예외처리해야 한다.
		try {
			// DB에 연결된 상태
			conn = DriverManager.getConnection(url, user, password);
			System.out.println("2단계:DB연결성공");

			// 쿼리가 준비된 상태
			psmt = conn.prepareStatement(sql);
			System.out.println("3단계:쿼리준비성공");

			// 쿼리실행
			rs = psmt.executeQuery();// 쿼리를 실행하고 결과를 반환해줌
			System.out.println("4단계:쿼리실행성공");
8. 결과 처리
<DTO(Data Trasnfer Object) 클래스>
DTO : 데이터를 효율적으로 운반하기 위함
사용자 정보 같은 데이터를 저장, 전달하는 용도
>> 은닉화, 생성자 오버로딩, getter/setter, toString() 메서드 활용
public class UserDto {
	private String userID;
	private String name;
	private int birthYear;
	private String addr;
	private String mobile1;
	private String mobile2;
	private int height;
	private Date mDate;
→ DB 테이블의 속성에 private로 접근하지 못하게 은닉화를 줌(수동작성)
//	기본생성자 : 매개변수가 없는 기본생성자
public UserDto() {
		super();
		// TODO Auto-generated constructor stub
	}
→ Source > ~ superclass =
package com.hk.board.dtos;

import java.util.Date;

//DTO객체: 데이터를 운반할때 사용할 객체
public class UserDto {
//	java 3대 개념: 은닉화, 상속, 다형성
//	필드들은 모두 **은닉화(encapsulation)**되어 있어,
//	외부에서 직접 접근하지 못하게 하고,
//	getter와 setter를 통해서만 접근하도록 설정

	private String userID;
	private String name;
	private int birthYear;
	private String addr;
	private String mobile1;
	private String mobile2;
	private int height;
	private Date mDate;


//	기본생성자 : 매개변수가 없는 기본생성자
	public UserDto() {
		super();
		// TODO Auto-generated constructor stub
	}

	//생성자 오버로딩
	// 모든 필드를 초기화 할 수 있게 매개변수를 받는다
	// super(); = 상위클래스(Object)의 생성자를 호출
	public UserDto(String userID, String name, int birthYear, String addr, String mobile1, String mobile2, int height,
			Date mDate) {
		super();
		this.userID = userID;
		this.name = name;
		this.birthYear = birthYear;
		this.addr = addr;
		this.mobile1 = mobile1;
		this.mobile2 = mobile2;
		this.height = height;
		this.mDate = mDate;
	}

	public UserDto(String userID, String name, int birthYear, String addr, String mobile1, String mobile2, int height) {
		super();
		this.userID = userID;
		this.name = name;
		this.birthYear = birthYear;
		this.addr = addr;
		this.mobile1 = mobile1;
		this.mobile2 = mobile2;
		this.height = height;
	}

	// Getter/Setter 메서드
	// 데이터를 가져오기 위한 Getter
	// 데이터를 설정하기 위한 Setter
	public String getUserID() {
		return userID;
	}

	public void setUserID(String userID) {
		this.userID = userID;
	}

	public String getName() {
		return name;
	}

	public void setName(String name) {
		this.name = name;
	}

	public int getBirthYear() {
		return birthYear;
	}

	public void setBirthYear(int birthYear) {
		this.birthYear = birthYear;
	}

	public String getAddr() {
		return addr;
	}

	public void setAddr(String addr) {
		this.addr = addr;
	}

	public String getMobile1() {
		return mobile1;
	}

	public void setMobile1(String mobile1) {
		this.mobile1 = mobile1;
	}

	public String getMobile2() {
		return mobile2;
	}

	public void setMobile2(String mobile2) {
		this.mobile2 = mobile2;
	}

	public int getHeight() {
		return height;
	}

	public void setHeight(int height) {
		this.height = height;
	}

	public Date getmDate() {
		return mDate;
	}

	public void setmDate(Date mDate) {
		this.mDate = mDate;
	}

	//toString() 메서드 : 객체의 상태를 문자로 반환
	//toString()---> Object 클래스에 구현되어 있음
	@Override
	public String toString() {
		return "UserDto [userID=" + userID + ", name=" + name + ", birthYear=" + birthYear + ", addr=" + addr
				+ ", mobile1=" + mobile1 + ", mobile2=" + mobile2 + ", height=" + height + ", mDate=" + mDate + "]";
	}

}
- UserDto 클래스는 사용자의 데이터를 구조화하고 쉽게 접근할 수 있게 도와줍니다.
- 은닉화를 통해 필드를 보호, 생성자를 통해 객체 생성 시 필요한 데이터를 초기화
- Getter/Setter는 데이터 접근을 제어, toString() 메서드는 객체의 정보를 쉽게 문자열로 표현
'SpringBoot' 카테고리의 다른 글
| OXTV 회원가입/로그인 (0) | 2025.05.26 |
|---|---|
| ReactJS (1) | 2024.10.29 |
| REST API (2) | 2024.10.28 |
